Exploring Free DNS Services
The Domain Name System (DNS) serves as a critical component of internet connectivity, translating human-readable domain names into IP addresses. While internet service providers usually offer DNS services, there are several free DNS providers available that offer enhanced performance, security, and customization options.

Google Public DNS
Google Public DNS is known for its reliability and speed. By switching to Google’s DNS servers (8.8.8.8 and 8.8.4.4), users can experience faster browsing and improved DNS resolution.
Cloudflare DNS
Cloudflare DNS is renowned for its privacy-focused approach and robust security measures. With primary and secondary servers at 1.1.1.1 and 1.0.0.1 respectively, Cloudflare DNS provides enhanced protection against DDoS attacks, faster response times, and encrypted DNS queries.
OpenDNS
OpenDNS distinguishes itself with its customizable filtering options, allowing users to tailor their DNS experience. It offers various levels of content filtering, including options for malware protection and parental controls. OpenDNS servers (208.67.222.222 and 208.67.220.220) can be easily set up on different platforms, providing an additional layer of security and content control.
Quad9
Quad9 is a nonprofit DNS provider focused on security and protection against malicious websites. By utilizing DNS servers at 9.9.9.9 and 149.112.112.112, users can safeguard themselves from malware, phishing attempts, and botnets. Quad9’s commitment to privacy and its robust threat intelligence systems make it a reliable choice for users seeking enhanced security.
How to Choose the Right Free DNS Provider
When selecting a free DNS provider, it’s essential to consider factors such as speed, security, privacy, and filtering options. Conducting performance tests and comparing features can help determine the best fit for your needs. It is worth noting that some providers offer additional features for a fee, so understanding your requirements and priorities will aid in making an informed decision.
How to Change DNS in Windows 10 and 11?
Follow these steps to update your DNS settings:

- Open the Network Connections settings:
- Press the Windows key + R to open the Run dialog box.
- Type “ncpa.cpl” and press Enter. This will open the Network Connections window.
- Select your active network connection:
- In the Network Connections window, locate the network connection you are currently using (e.g., Ethernet or Wi-Fi).
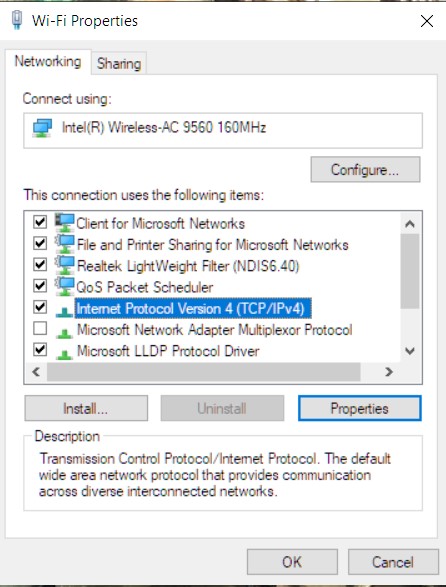
- Right-click on the active network connection and select “Properties” from the context menu.
- Configure IPv4 DNS settings:
- In the Properties window, locate and select “Internet Protocol Version 4 (TCP/IPv4)” from the list.
- Click on the “Properties” button below.
- Specify DNS server addresses:
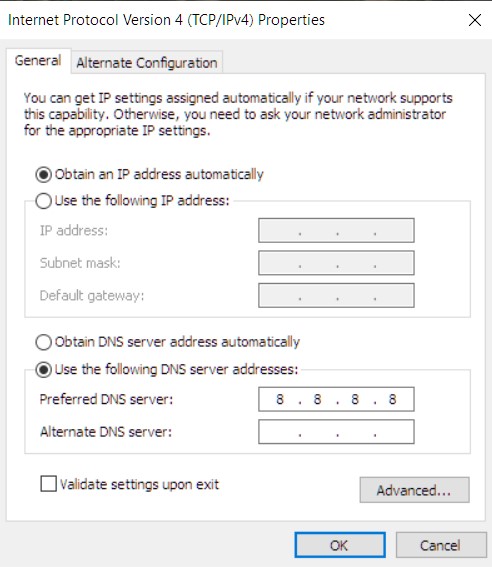
- In the Internet Protocol Version 4 (TCP/IPv4) Properties window, select the “Use the following DNS server addresses” option.
- Enter the preferred DNS server address in the “Preferred DNS server” field. This could be the IP address of the DNS provider you wish to use.
- Optionally, enter the alternate DNS server address in the “Alternate DNS server” field. This can be another DNS provider’s IP address or left blank.
- Save and apply the changes:
- Click the “OK” button to save the changes and close the Properties window.
- If you made any changes to your network connection settings, close the Network Connections window.

Conclusion
Free DNS services provide an opportunity to enhance your internet experience by offering improved performance, security, and customization options. Whether you opt for Google Public DNS, Cloudflare DNS, OpenDNS, Quad9, or explore other providers, the benefits of switching extend beyond mere DNS resolution. Take advantage of these free offerings and empower yourself with a faster, more secure, and tailored internet experience.


![[Steam Link] How to Play Steam Games on Your Phone?](https://technobrax.com/wp-content/uploads/2022/10/Screenshot_2022-10-04-18-30-24-971_com.valvesoftware.steamlink-1-768x355.jpg)


